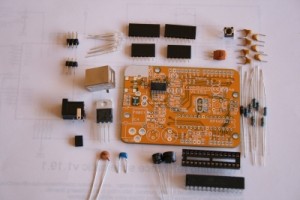
We had a fantastic weekend at LVL1. Not only was LVL1 at an awesome Actors Theater event, we also had some important visitors at the space on Saturday! On Saturday, Mitch Altman (of TV-B-Gone fame) and Jimmy Rodgers (of LOLshield fame) presented a soldering workshop. There must have been 50 people around! Also Matt Mets and Dale Dougherty were here from Make Magazine. Big thanks to Mitch, Jimmy, Matt and Dale for being part of the LVL1 experience. Our doors are always open to you!
During the soldering workshop, I built at LOLShield. Nice kit - lots of LEDs to solder. Jimmy was really good at making his LEDs come out in neat little rows - mine, not so much. Here is my video
I came upon this post and decided to make an animated LOLShield LVL1 logo. I had to download python 2.6 and the PIL library and the script ran perfectly. I created an animated gif using Gimp. Set up an image to be 9X14 in grayscale. Then draw your picture (zoomed in) and animate it using multiple layers. When you save as a gif, Gimp will make the layers into a animated gif. It is not hard. Here is my gif...

It is tiny! Next run the script in the command line and then cut and paste the code. Here is the Arduino program I am using.
/*

 Basic LoL Shield Test
Writen for the LoL Shield, designed by Jimmie Rodgers:
LoL Shield
This needs the Charliplexing library, which you can get at the
LoL Shield project page: http://code.google.com/p/lolshield/
Created by Jimmie Rodgers on 12/30/2009.
Adapted from: http://www.arduino.cc/playground/Code/BitMath
History:
December 30, 2009 - V1.0 first version written at 26C3/Berlin
This is free software; you can redistribute it and/or
modify it under the terms of the GNU Version 3 General Public
License as published by the Free Software Foundation;
or (at your option) any later version.
This library is distributed in the hope that it will be useful,
but WITHOUT ANY WARRANTY; without even the implied warranty of
MERCHANTABILITY or FITNESS FOR A PARTICULAR PURPOSE. See the GNU
Lesser General Public License for more details.
You should have received a copy of the GNU Lesser General Public
License along with this library; if not, write to the Free Software
Foundation, Inc., 51 Franklin St, Fifth Floor, Boston, MA 02110-1301 USA
*/
#include //AVR library for writing to ROM
#include //Imports the library, which needs to be
//Initialized in setup.
int blinkdelay = 100; //Sets the time each frame is shown
/*
The BitMap array is what contains the frame data. Each line is one full frame.
Since each number is 16 bits, we can easily fit all 14 LEDs per row into it.
The number is calculated by adding up all the bits, starting with lowest on
the left of each row. 18000 was chosen as the kill number, so make sure that
is at the end of the matrix, or the program will continue to read into memory.
Here PROGMEM is called, which stores the array into ROM, which leaves us
with our RAM. You cannot change the array during run-time, only when you
upload to the Arduino. You will need to pull it out of ROM, which is covered
below. If you want it to stay in RAM, just delete PROGMEM
*/
uint16_t BitMap[][9] PROGMEM = {
{ 16382 , 8193 , 10501 , 11525 , 10581 , 10581 , 11053 , 8193 , 8191 , },
{ 16381 , 8193 , 10501 , 11525 , 10581 , 10581 , 11053 , 8193 , 12287 , },
{ 16379 , 8193 , 10501 , 11525 , 10581 , 10581 , 11053 , 8193 , 14335 , },
{ 16379 , 8193 , 10501 , 11525 , 10581 , 10581 , 11053 , 8193 , 15359 , },
{ 16375 , 8193 , 10501 , 11525 , 10581 , 10581 , 11053 , 8193 , 15359 , },
{ 16367 , 8193 , 10501 , 11525 , 10581 , 10581 , 11053 , 8193 , 15871 , },
{ 16351 , 8193 , 10501 , 11525 , 10581 , 10581 , 11053 , 8193 , 16127 , },
{ 16319 , 8193 , 10501 , 11525 , 10581 , 10581 , 11053 , 8193 , 16255 , },
{ 16255 , 8193 , 10501 , 11525 , 10581 , 10581 , 11053 , 8193 , 16319 , },
{ 16127 , 8193 , 10501 , 11525 , 10581 , 10581 , 11053 , 8193 , 16351 , },
{ 15871 , 8193 , 10501 , 11525 , 10581 , 10581 , 11053 , 8193 , 16367 , },
{ 15359 , 8193 , 10501 , 11525 , 10581 , 10581 , 11053 , 8193 , 16375 , },
{ 14335 , 8193 , 10501 , 11525 , 10581 , 10581 , 11053 , 8193 , 16379 , },
{ 12287 , 8193 , 10501 , 11525 , 10581 , 10581 , 11053 , 8193 , 16381 , },
{ 8191 , 8193 , 10501 , 11525 , 10581 , 10581 , 11053 , 8193 , 16382 , },
{ 16383 , 1 , 10501 , 11525 , 10581 , 10581 , 11053 , 8192 , 16383 , },
{ 16383 , 8193 , 2309 , 11525 , 10581 , 10581 , 11052 , 8193 , 16383 , },
{ 16383 , 8193 , 10501 , 3333 , 10581 , 10580 , 11053 , 8193 , 16383 , },
{ 16383 , 8193 , 10501 , 11525 , 2388 , 10581 , 11053 , 8193 , 16383 , },
{ 16383 , 8193 , 10501 , 11524 , 10581 , 2389 , 11053 , 8193 , 16383 , },
{ 16383 , 8193 , 10500 , 11525 , 10581 , 10581 , 2861 , 8193 , 16383 , },
{ 16383 , 8192 , 10501 , 11525 , 10581 , 10581 , 11053 , 1 , 16383 , },
{18000}
};
void setup() {
LedSign::Init(); //Initializes the screen
}
void loop() {
DisplayBitMap(); //Displays the bitmap
}
void DisplayBitMap()
{
boolean run=true; //While this is true, the screen updates
byte frame = 0; //Frame counter
byte line = 0; //Row counter
unsigned long data; //Temporary storage of the row data
while(run == true) {
for(line = 0; line < 9; line++) {
//Here we fetch data from program memory with a pointer.
data = pgm_read_word_near (&BitMap[frame][line]);
//Kills the loop if the kill number is found
if (data==18000){
frame = 0;
data = pgm_read_word_near (&BitMap[frame][line]);
//run=false;
}
//This is where the bit-shifting happens to pull out
//each LED from a row. If the bit is 1, then the LED
//is turned on, otherwise it is turned off.
else for (byte led=0; led<14; ++led) {
if (data & (1<
I had to adjust the code to keep it from blinking at the end of the animation.


